Thursday, April 5, 2012

Bunny Banner Tutorial, By LRS Designer/Co-Owner, Sara Garza

I saw the cutest Peep Bunny Banner on Pinterest and fell in love with it and being a paper crafter at heart I knew I had to make one for myself using pattern paper.  Once you see Dana's peep banner you will know what I mean.  : )  Below are the instructions on how to make the banner I made.

Supplies Needed:
Bunny Pattern - See Link in Step 1
Pattern Paper
Ink
Letter Stickers
White Acrylic Paint
Ribbon or String
Embellishments such as Jute and Flowers


STEP 1:  Print the "Peep" Bunny Pattern onto cardstock and cut it out.  The "Peep" bunny pattern can be found online here:  http://www.danamadeit.com/2008/07/tutorial-peeps-bunny-bunting-and-door-hangers.html .

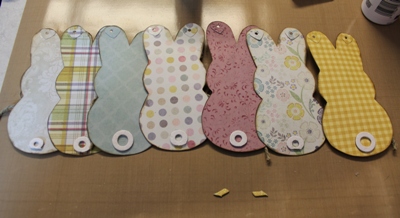
STEP 2:  Pick out some of your favorite pattern papers and trace the bunny pattern on the backside of the papers (the side you don't want to show) and cut them out.  I traced and cut out seven bunnies.

STEP 3:  Ink the edges.


STEP 4:  Take a small paper punch and punch out two shapes for each bunny you cut out for your banner using the same pattern papers as the bunnies.  Adhere one punched out shape to the backside of each of the bunny’s ears as close to the tops of the ears as shown.  This will help reinforce the pattern paper when you hang your banner.  Note:   I used an XS heart shape paper punch because I couldn't find my circle punch, but I think a circle punch would probably work better when punching the holes in the ears.

STEP 5:  Punch holes at the top of each of the ears and decorate
 the front sides of the bunnies.  
  
STEP 6:  And just because I never know what to do with all my numbers that I always have left over on my sticker sheets -- Select a few 0's, 6’s, 9’s or 8's from a sheet of American Crafts Thickers and cut out the circle parts of the numbers and paint them with white acrylic paint.   Let them dry and then adhere them to the backside of the bunnies for tails as shown.
STEP 7:  String a piece of ribbon or string through the holes on the bunnies' ears and your banner is complete.  Note:  I used some May Arts paper raffia and tied the ribbon at each of the holes so it would prevent the bunnies from sliding around on the banner and possibly tearing the ears.


Hang your banner and enjoy!  Here is my bunny banner hanging on my office door.  I hope you try making one of these for yourself or make one to slip into someone’s Easter basket.

Supplies Used:
My Mind's Eye Miss Caroline, Fiddlesticks "Story" - Plaid Paper (Feb 2012 Kit)
My Mind's Ee Miss Caroline, Fiddlesticks "Home" - Dotted Paper (Feb 2012 Kit)
My Mind's Eye Miss Caroline, Fiddlesticks "You & Me" - Damask Paper (Feb 2012 Kit)
My Mind's Eye Miss Caroline, Fiddlesticks "You & Me" - Bloom Paper (Feb 2012 Kit)
Prima Paper Flowers (Feb 2012 Kit)
Tim Holtz Distressing Ink
Maya Arts Paper Raffia
Jute

 
Thanks for stopping by and I hope everyone has a HAPPY EASTER!!

~ Sara ~

Sunday, April 1, 2012

April 2012 Kit Reveal

Our April 2012 kit is now available in our store for purchase.  You are going to love the Pink Paislee "Prairie Hill" papers.  The prints of the "Prairie Hill" papers remind me of spring time calico print fabrics, and they are sure to please with an breezy color palette and with the prints of flowers and kites!  Click here for main kit and kit add-on contents.

LRS April 2012 Main Kit:


April 2012 Embellishment Add-On:
April 2012 Ribbon Add-On:


April 2012 Color Cardstock Add-On:
April 2012 Alphabet Add-On:

April 2012 Coordinating Stamp:


Thanks for stopping by and taking a look!  Also, don't forget about our DT call -- see below post for more information.

~ Sara ~

Friday, March 30, 2012

Design Team Call

Little Red Scrapbook Kit Club is having a Design Team Call!! If you love to scrap with monthly kits and have oodles of creativity just waiting to be recognized, we would like to see what you’ve got. We are putting together a new Design Team with up to 5 members who are up to the challenge.

Requirements include:
1. Ability to produce 3 layouts and 1 card or paper craft project per month with a set deadline using mostly items from the main kit and kit add-ons.
2. Good photography skills for taking pictures of your projects.
3. Ability to come up with fun and creative challenges every month.
4. Projects posted with social media: Facebook, your personal blog, Pinterest, and our Little Red Scrapbook Blog and at least one online gallery.
5. Participation in our friendly Message Board and Gallery at least 4 times weekly.
6. Participation in our Blog, including writing your own posts.
7. Participation in Blog Hops and Special Events.
8. Ability to participate fully for a 12 month term.
9. Open to US residents only at this time.

Does that sound fun? If it does, it’s about to get better. Here’s what we’ll do for you in return:
1. Send you a Monthly Main kit for free.
2. Offer you a discount on the current Kit Add-Ons; if you choose to purchase them, they will be sent with your Main Kit for free.
3. Name, bio and photo featured on our DT Page.
4. Link from our DT Page and Blog to your personal blog.
5. Social Media exposure of your designs.
6. Give you our undying gratitude and amazement for your creations!!

What do you need to do to enter? That’s easy too!
1. Submit photos of 4 of your most favorite recent (last 3-6 months) work that highlights your own personal style, your skills and your creativity to lrs.dt.call@gmail.com . Projects do not need to use Little Red Scrapbook kits, but we’d love it if they did! Please use the subject line LRS DT CALL. Please no photos bigger than 500 kb each.
2. Write up a quick bio about yourself, mentioning why you’re interested in being on our DT, what experience (if any) you have with DTs, and why you love scrapbooking/paper crafting/cardmaking. Please include a current DT resume (with current obligations) if you have one and contact information (name, address, phone number, email and blog address).
3. Submissions must be received NO LATER than Saturday, April 14, 2012. Submissions received after this date will not be considered for our DT.
4. Applicants selected will be notified by April 16th and the full announcement will be made shortly after that.

If you are reading this, I hope you will consider applying!  Good Luck to all those who apply!

~ Sara ~

Altered Washer Necklace Tutorial - By Design Team Member, Karrie Cook

Supplies Needed:
  • 2” metal washer
  • 1.75” metal washer
  • 30” white cording
  • Pattern paper
  • Butterfly embellishment

Note:  Metal washers can be found at hardware stores.  You can use any size washer desired.


Instructions:

  1. Trace washers on pattern paper and cut out.
  2. Glue to metal washers with Mod Podge.
  3. Sand edges.
  4. Tie cord around both washers.
  5. Add butterfly embellishment with glue dot.


Wear with your favorite spring time outfit!

Thanks Karrie for such a fun and easy tutorial.  I hope this will inspire you to make one for yourself or make one for a sweet gift!

~ Sara ~

March 2012 Kit Reveal

Laugh, I know March is nearly over, but couldn't let the month end without posting March's kit pictures on our blog.  It is such a fun and happy kit, with blues, reds and greens and who can resist all of the sweet birds and hearts the Bo Bunny Alora papers have to offer!  You can check out the kit contents by clicking here.

LRS March 2012 Main Kit:


March 2012 Embellishment Add-On: 

March 2012 Ribbon Add-On:

March 2012 Color Cardstock Add-On:

March 2012 Alphabet Add-On:


Coordinating Stamp:

We also have available in our store the March/April 2012 Theme kit jam packed with Glitz Design Dance In Sunshine collection papers and embellishments.

Thanks for stopping by and taking a look!

Sara


Wednesday, February 1, 2012

Out with the Old, In with the New - Blog Hop Winners!!

I would like to say THANK YOU to everyone who participated in our Blog Hop!  You made it fun for all of us.  I really enjoyed reading all of your blog comments, saying hi to a few new faces, and checking out all of the wonderful projects. 

Here are the winners:

Step 1 Winner of the Blue Prize Pack:


Step 2 Winner of the Orange Prize Pack:


Step 3 Winner of the Green Prize Pack:

and last but not least Winner of the LRS Grand Prize:


Congratulations to all of you!!  If you are a winner, please send your address to sara@littleredscrapbook.com and put "Blog Hop Winner" in the subject line.

Thanks again to all who participated!

Sara


LRS February 2012 Kit Reveal

Our February kit is the perfect blend of masculine with the wood grain printed papers and feminine with the floral papers; it's the absolute perfect kit for everyone's needs.  These kits are in our store now, so be sure to order yours before they are sold out.

February 2012 Main Kit -

February 2012 Embellishment Add-On -
February 2012 Alphabet Add-On:

February 2012 Ribbon Add-On

February 2012 Color Cardstock Add-On:

We still have a few of the January February Theme kits left too.  They make beautiful Valentine's Day gifts!!


Thanks for stopping by, and I hope you have a wonderful rest of the week.

Sara